Installation Guide
This guide provides step-by-step instructions for installing RevMax on your server. This tutorial will reference an install using cpanel.
On this page:
Server Requirements
- Dedicated server or VPS with at least 4GiB of RAM
- PHP version 5.6 to 7.1
- MySQL 5.6+ (MariaDB 10.0+ preferred.) Supported engines are MyISAM, Aria, InnoDB, Percona XtraDB, TokuDB
- ionCube Loader
- PHP mbstring extension
- PHP curl extension
- PDO MySQL extension
Quickstart Step-by-Step
- Ensure server requirements above are met.
- Download RevMax from your account at revmax.com. Upload the RevMax.zip file to a location outside of public_html (or equivalent) and extract.
- Move the CONTENTS of the RevMax/public directory to the public_html directory (or equivalent). The contents are the /admin/ directory, index.php file, and .htaccess file.
- Adjust the include path in the /public_html/admin/index.php file to include /absolute/path/to/RevMax/src/Bootstrap/admin-loader.php
- Adjust the include path in the /public_html/index.php file to include /absolute/path/to/RevMax/src/Bootstrap/tracking-loader.php
- *Note that the above include paths assumed a basic install using cPanel. The source code directory (RevMax) and its location can be anywhere. Just adjust the include path in the index.php files.
- Add your license key to the license.ini file located at RevMax/config/license.ini
- Create a database and database user (with ALL PRIVILEGES granted.) Add the database/user credentials to the database.ini file located at RevMax/config/database.ini
- *Recommended → set a custom admin password key. See here
- *Recommended → set a custom application encryption key. See here
- To finish installation and create your account, navigate to /admin/install/ in your browser.
- Set a cron on file RevMax/bin/cron.php to run every 3-5 minutes. This cron will aggregate reporting data.
NGINX Considerations
- Occasional, due to nginx configuration settings affecting cookies, it may be necessary to set the host name in the revmax.ini file. See setting a host name below.
- This app uses rewrite rules. These rules are declared in the /public_html/admin/.htaccess and /public_html/.htaccess files. As nginx ignores these files, convert the rules and declare in the appropriate conf file.
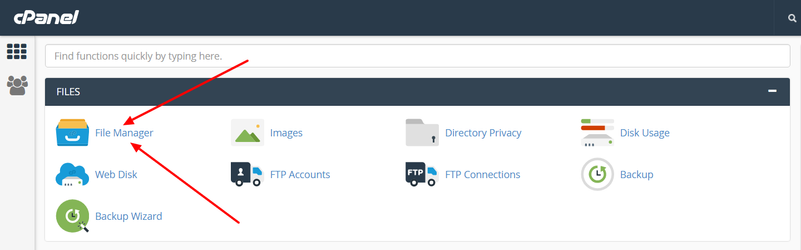
Uploading RevMax to your Server
The recommended way to upload the files is to use the File Manager in cpanel (seen below.)
A video of this may be easier for some users to follow. View the video here.
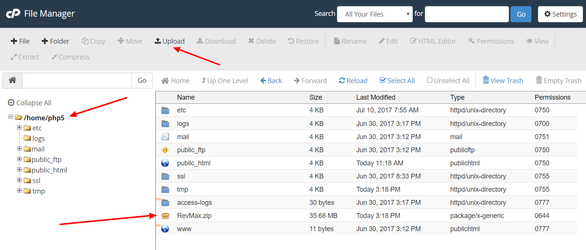
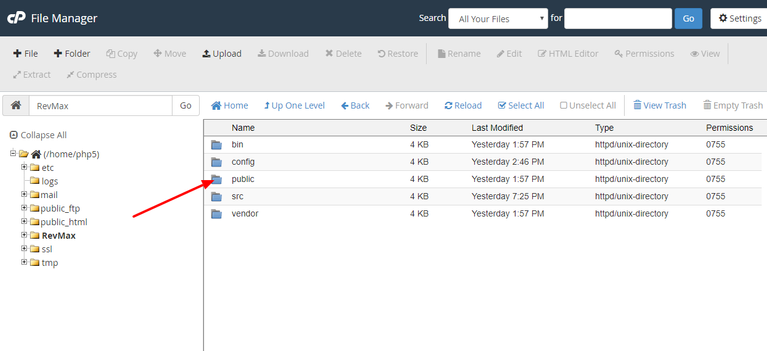
- Upon entering the File Manager, you will be in the base directory (1 level "above" public_html). In this example, this is /home/php5/. Using the "Upload" in the File Manager horizontal Menu, upload the RevMax.zip file to this location.
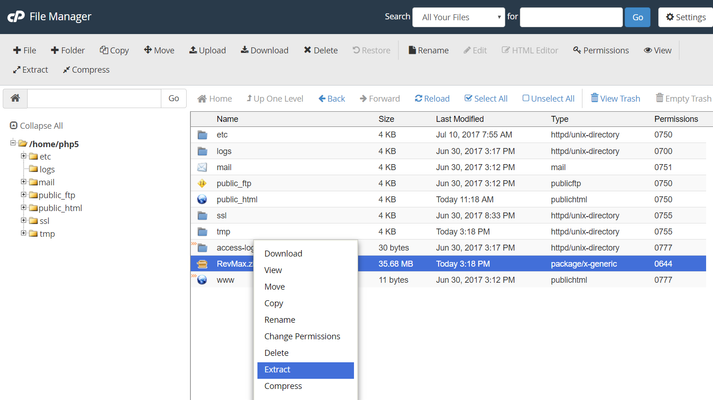
- Once uploaded, right click RevMax.zip, and click extract. When the popup appears, just click "Extract Files" to extract in this directory. Click "close" when the results popup appears.
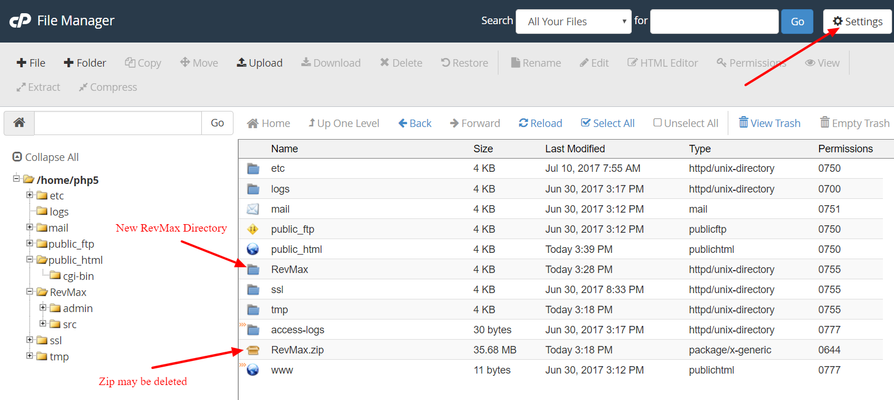
- Once extracted, there will now be a RevMax directory, and a RevMax.zip file. The zip file may be optionally deleted at this point.
- Click into the RevMax directory.
- Click the "Settings" button at the top right, click "Show Hidden Files" in the popup, and then click "Save". *Note - this step may be necessary to see the .htaccess files.
- Click into the public directory.
- Click "Select All". This will highlight the admin directory, .htaccess file, and index.php file.

- When the popup appears, enter /public_html and click the "Move Files" button.
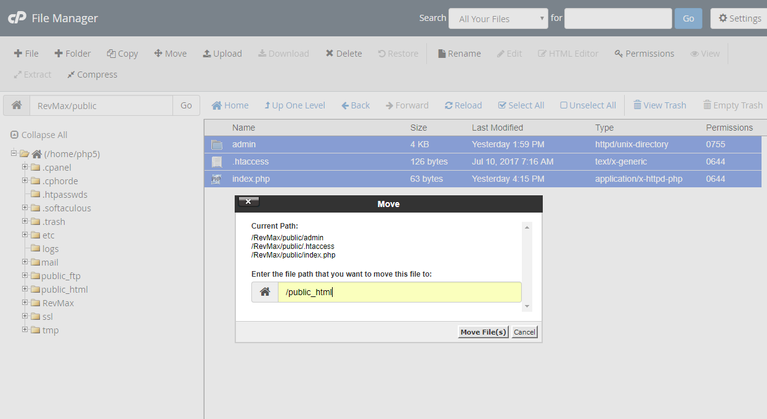
- Once completed, the /admin/ directory, index.php file, and .htaccess file will be in the public_html directory.
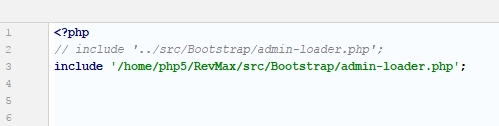
- Edit the include path in the /public_html/admin/index.php file to include /absolute/path/to/RevMax/src/Bootstrap/admin-loader.php
- Edit the include path in the /public_html/index.php file to include /absolute/path/to/RevMax/src/Bootstrap/tracking-loader.php
In our example, the absolute path will be /home/php5/RevMax/src/Bootstrap/*-loader.php
If the example was followed above, you can find the first part of the include path in the root of the doc tree of the File Manager (see the image above.) Ours is /home/php5
Add the first part to /RevMax/src/Bootstrap/*-loader.php to get the respective includes (as seen above)
Below is an example of the /admin/index.php file with the original path commented out and a new include path set.
Creating the Database
The easiest way to create the database is to use the MySQL Database Wizard in cpanel.
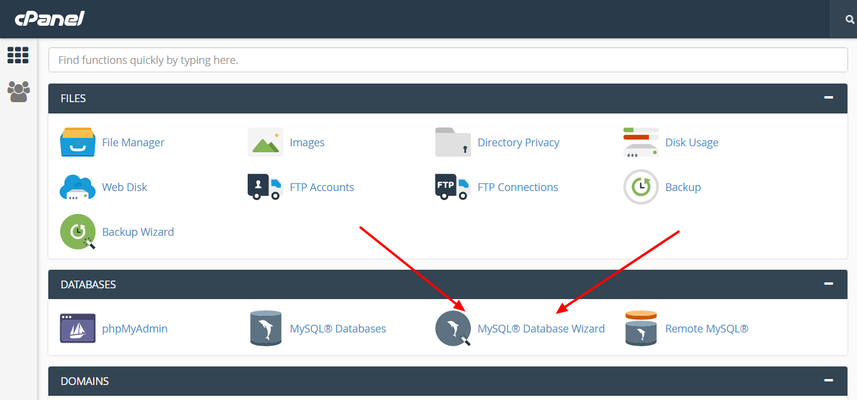
- Create A Database
- Create Database User
- Add user to the database (check the ALL PRIVILEGES box)
- Set the database credentials as described in the next section.
Setting Database Credentials
After creating the database, you will need to add the applicable values in the RevMax/config/database.ini file. An example of a properly set database.ini file can be seen below;
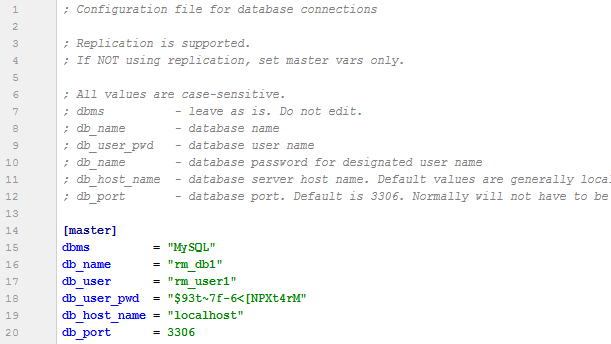
Explanation;
- For a single database (majority or users), set database configuration values under the 'master' section marker.
- 'slave_*' section markers can be added if using replication.
- [master] - section marker. Brackets are required.
- dbms - Leave as "MySQL"
- db_name - this is the name of the database you created
- db_user - this is the name of the database user assigned to the database
- db_user_pwd - the password assigned to the database user
- db_host_name - database server host name. Default values are generally localhost or 127.0.0.1 Normally will not have to be changed.
- db_port - database port. Default is 3306. Normally will not have to be changed.
For more information (including information on replication), see the Setting Database Configuration tutorial.
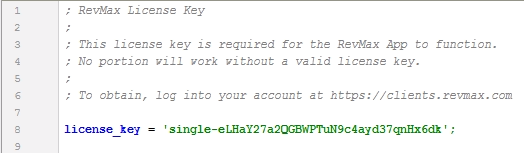
Setting the RevMax License Key
A valid license key is required to use RevMax. The key may be obtained by logging into your account at https://clients.revmax.com
Once you have your license key, edit the license.ini file located at RevMax/config/license.ini as seen below.
Pre-Installation Steps
Important (but optional) revmax.ini file settings
Here you will find a few optional configuration settings that will help secure your installation.
Setting a custom admin password key
revmax.ini → "admin_password_key" (line 89) → Default: empty
The 'admin_password_key' is a unique text key for password encryption. It is important to remember that this is not a password. It is a cryptographic key used for consistent encryption/decryption OF your password.
Guidelines for creating your unique key;
- The key MUST be 16 BYTES, and can contain number, letters and symbols.
- Byte size may or may not be the same as character count.
- Characters like ñ or é (and many others) are 2 bytes or more each.
- Latin letters, numbers, and most symbols are 1 byte each. Example; this 16 character key is 16 bytes as they are all latin letters and numbers → a1c2e3g4i5k6m7o8
- If this is left blank, or has the wrong byte size (must by 16), the default app key will be used.
Methods for accurately determining the byte size;
- command line
$ php -a
$ echo mb_strlen('admin_password_key_value', '8bit'); - PHP page
Create a PHP page and upload the following;
<?php echo mb_strlen('admin_password_key_value', '8bit');
Load the page in your browser. Result will print out.
Setting a custom application encryption key
revmax.ini → "app_encryption_key" (line 107) → Default: empty
The 'app_encryption_key' is a unique encryption key for app encryption. It is important to remember that this is not a password. It is a cryptographic key used for consistent encryption/decryption by various functions in the application.
- If this is left blank, or the wrong length is assigned, the default app key will be used.
Methods for generating the application encryption key;
- command line
$ php -a
$ echo base64_encode( openssl_random_pseudo_bytes( 32 ) ); - PHP page
Create a PHP page and upload the following;
<?php echo base64_encode( openssl_random_pseudo_bytes( 32 ) );
Load the page in your browser. Result will print out.
Setting a host name
revmax.ini → "host_name" (line 25) → Default: empty
For improved security, session, and cookie handling, set the domain name of the server. While generally optional, this may be necessary in some circumstances (nginx) depending on the server configuration.
- DO NOT add the install path → i.e. tracking.com/rm/
- DO NOT include the schema → http or https
- If left blank, this will default to the $_SERVER['SERVER_NAME'] value.
Sub-directory example; This will add only trk1.tracking.com to the approved hostname list.
- host_name = 'trk1.tracking.com';
Top level domain example; This example will add tracking.com and www.tracking.com to the approved hostname list.
- host_name = 'tracking.com';
Settings if using a load balancer
If using a load balancer, it may be necessary to change the $_SERVER variables for the ip address and port.
primary_ip_variable setting;
- revmax.ini → "primary_ip_variable" (line 53) → Default: "REMOTE_ADDR"
- Alternate example → "HTTP_X_FORWARDED_FOR"
- Accepted Values → 'REMOTE_ADDR', 'HTTP_X_FORWARDED_FOR', 'HTTP_X_CLUSTER_CLIENT_IP', 'HTTP_X_CLUSTER_IP'
primary_port_variable setting;
- revmax.ini → "primary_port_variable" (line 59) → Default: "SERVER_PORT"
- Alternate example → "HTTP_X_FORWARDED_PORT"
- Accepted Values → 'SERVER_PORT', 'HTTP_X_FORWARDED_PORT', 'HTTP_X_CLUSTER_CLIENT_PORT', 'HTTP_X_CLUSTER_PORT'
Choosing a session handler
revmax.ini → "session_save_handler" (line 38) → Default: "files"
This will direct the RevMax SessionHandler to either use the default files or the database for session storage. Most users can utilize files. If using a multi-instance server option (like AWS Elastic), then database will need* to be used.
*If using a service like Elastic, it is also possible to leave this set at files and use a Redis instance (or other memory-based storage) for session storage. In that case, set the appropriate settings in the php.ini file.
- Setting accepts 'files' or 'database'. 'files' is the default.
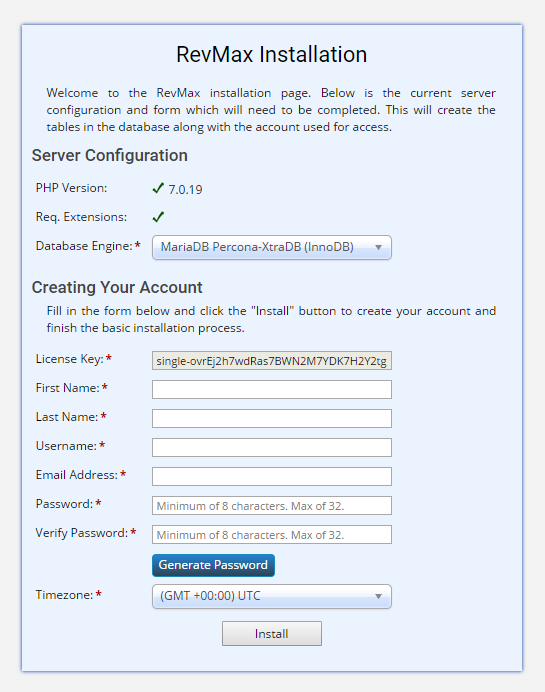
Installation
To finish installation and create your account, navigate to /admin/install/ in your browser. You will see the following form;
*Note - the install page will return a 404 not found if the installation has already been completed, or the install directory is missing from the server.
All of the fields are required for installation.
- Database Engine - select the engine for your install. InnoDB is the recommended engine. If available (with MariaDB), Aria is secondary. See below for more information.
- First Name - self-explanatory
- Last Name - self-explanatory
- Username - this will be the user name for logging into your installation. It does NOT need to be the same as your clients.revmax.com account login username. Please do not use 'admin'...
- Email Address - this will be used for password recovery. It does NOT need to be the same as your clients.revmax.com account email.
- Password - a strong password is always recommended.
- Timezone - select the timezone for your stats and applicable date/time functions. By default, the server timezone will display.
If any of the server requirements are missing, you may see a display similar to this;
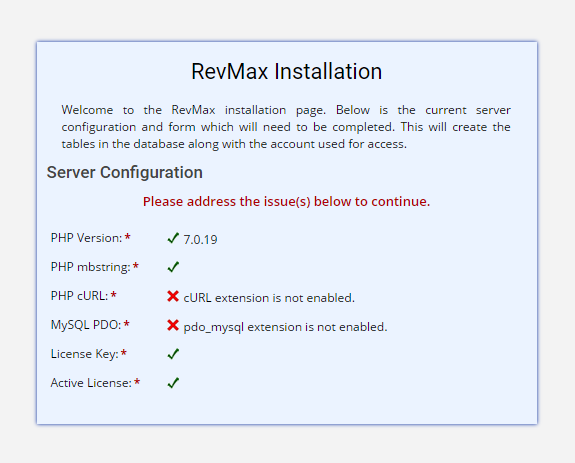
Any issues will need to be addressed before continuing with the installation.
Post Installation
Now that the primary installation is complete, there are a few more revmax.ini settings that may be changed.
Setting an Alternate Login Page
revmax.ini → "alternate_login_page" (line 118) → Default: empty
For added security, you may change the name of the login page by adding a value to 'alternate_login_page'. This will essentially 'hide' your login page as you will be the only one who knows the url.
- Do not add the php extension. Example => "my-secret-page"
- If this is set, bookmark or remember the new page. For security, log outs and session timeouts will NOT be redirected to the login page.
- Default login page will produce a 404 -> /admin/login/
Requiring https for Login
revmax.ini → "force_secure_admin" (line 111) → Default: false
Setting this to true will disable logging in to admin unless using https.
Turning off Public Password Recovery
revmax.ini → "allow_password_reset" (line 122) → Default: true
Setting this to false will disable the password recovery option. Any attempt to view or post to this page will result in a 404.
Recording All Login Attempts
revmax.ini → "log_all_logins" (line 129) → Default: false
Setting this to true will log every attempt (successful and unsuccessful) to login to your application. When set to false, RevMax will only log failed login attempts.
Other General Settings
Looking in the revmax.ini file, you may notice a few other display options. Documentation is available in the file, or you may refer to the RevMax Application Settings section for more details.
Cron Job
RevMax v2018+ requires a cron job to be set in order to aggregate the reporting data.
- Set a cron on file RevMax/bin/cron.php to run every 3-5 minutes.
- Cron run time will average 1-30 seconds depending on load.
Troubleshooting
Blank Install Page
Generally, this is the result of an issue with the rewrite rules. RevMax ships with 2 .htaccess files. 1 is located in the root, the other is located in the admin directory. If these were not uploaded/copied properly, the install/login page will be blank.
If using cPanel, the .htaccess file will not be displayed by default. Clicking "Settings" at the top right and checking "Show Hidden Files" will make the file visible.
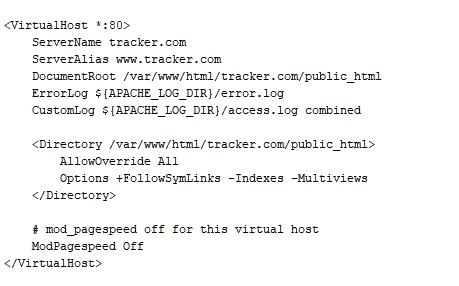
This can also happen if the server has virtual host files and the domain virtual host file is missing the directives allowing the .htaccess file to be read.
- AllowOverride All
- Options +FollowSymLinks -Indexes -Multiviews
Below is an example entry in a virtual host file with these directives.
Blank Install Page nginx
As nginx does not read .htaccess files, the rewrites must be added to the appropriate configuration file.
Below is an example.
    #revmax rewrites

    # serve static files directly
    location ~* ^.+.(jpg|jpeg|gif|css|png|js|ico|html|xml|txt)$ {
        access_log        off;
        expires           max;
    }

    location /admin/ {
        # Check if a file exists, or route it to index.php
        try_files $uri $uri/ /admin/index.php?$args;
    }

    location / {
        # Check if a file exists, or route it to index.php
        try_files $uri $uri/ /index.php?$args;
    }
Fatal Error on the Install Page
This can happen under the following circumstances;
- Syntax error in the php code. For example, a missing semi-colon at the end of the line. An extra apostrophe in the line of code will cause this as well.
- The absolute path for the admin-loader include is incorrect.
404 Not Found on Install Page
This is usually the result of the /admin/index.php file including the tracking-loader.php file instead of the admin-loader.php file.
License Key Errors
A valid license key is required to install RevMax. If the license key is missing from the RevMax/config/license.ini file, you will see the following when visiting /admin/install/
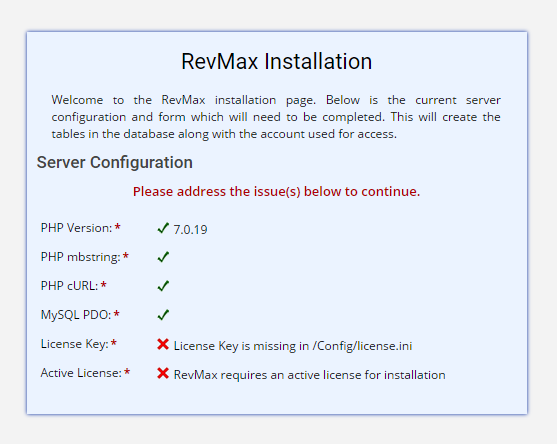
To address, add your license key as described above at Setting the RevMax License Key
If there is an error for the Active License and your license key is entered properly in the license.ini file, contact RevMax support so we can reissue the license.
Database Connection Errors
In the event there is an issue connecting to the database, you will see a message similar to the following;
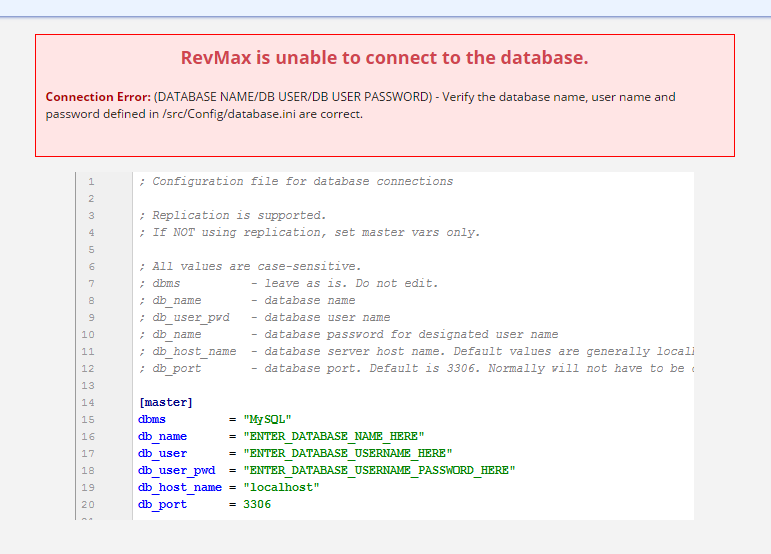
The error message will give you information on how to solve this issue. Generally, this will be seen if there is a typo in one of the variables, or improper permissions were assigned. Double check that the variables are entered correctly. In some cases, it may be easier to create a new database and user if the issue persists.
If you continue to see an issue, contact RevMax support for assistance.
Getting Help
If you have trouble, email us at support.revmax.com